


For large transfer sticker prints, we recommend using the hinge method for a flawless installation. This is a slower and more meticulous method but will provide the best results. If any other techniques are used we cannot guarantee that proper alignment and bubble-free installation will occur.
Below is the step-by-step guide for this type of installation.
Click on photos to enlarge and view detail.
Determine Installation Direction
The first thing you need to do is plan out the direction you will be installing your print.
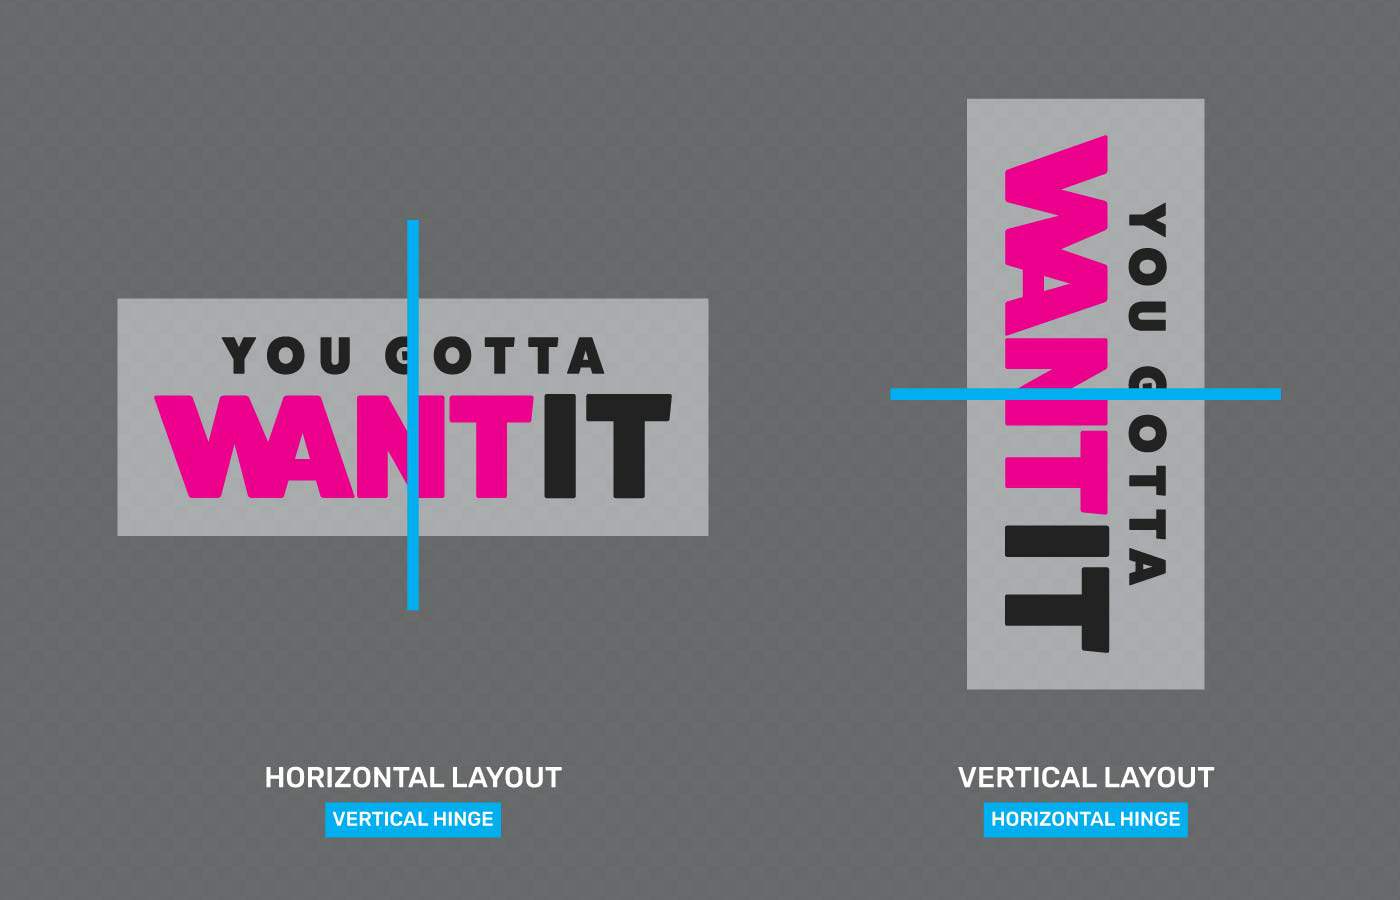
Horizontal Layout
We recommend for prints that have a horizontal orientation (landscape – wider than its height) to create a vertical hinge and install one section (left or right) first. Then after that side has been installed completing the installation of the second section.
Vertical Layout
We recommend for prints that have a vertical orientation (portrait – taller than its width) to create a horizontal hinge and install one section (top) first. Then after that side has been installed completing the installation of the second section (bottom).
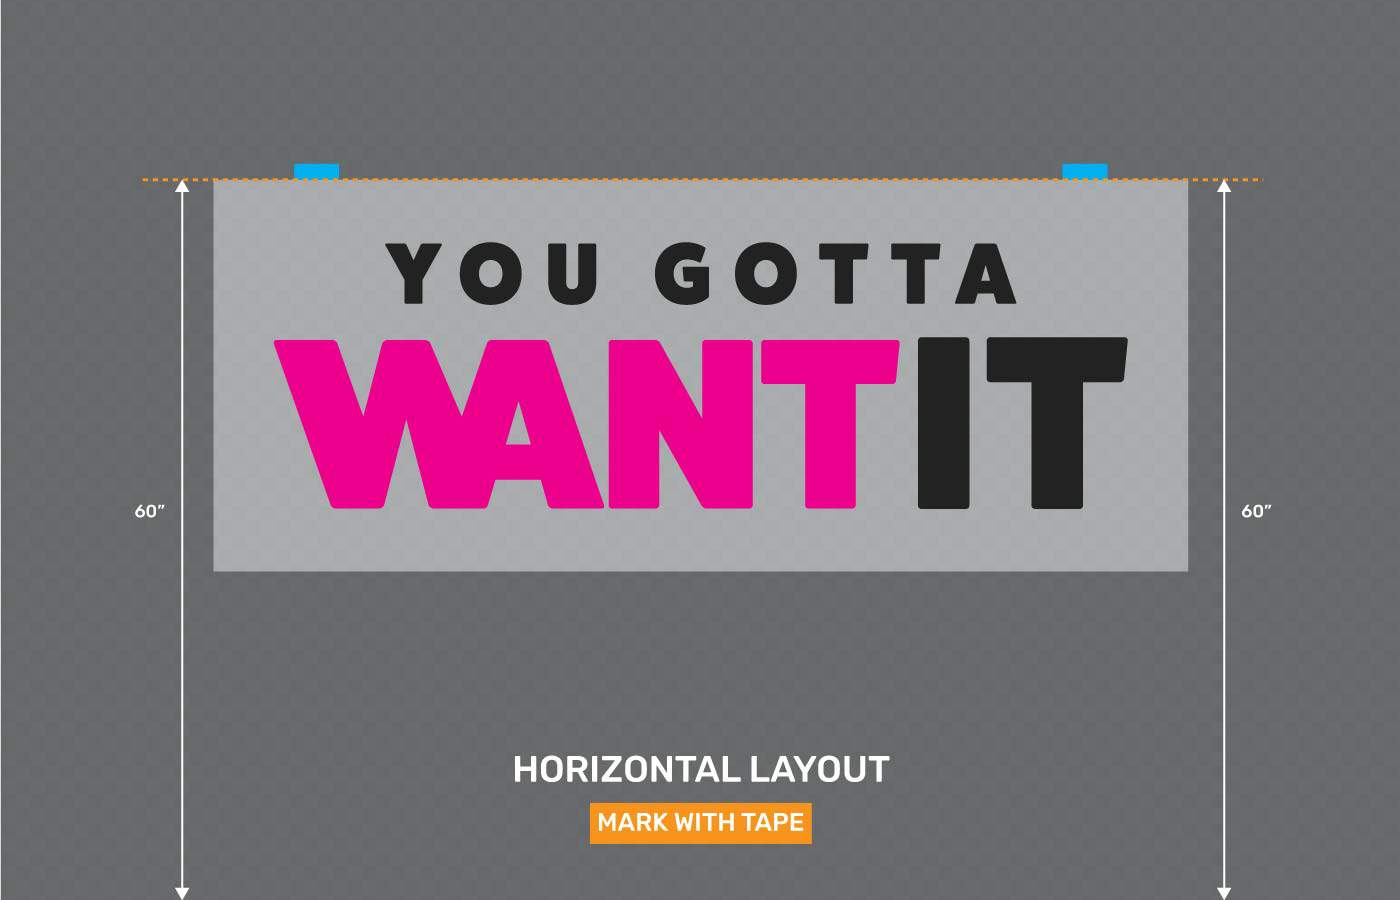
Measure and Position
There are many ways to measure, position, or level the print prior to installation. The method we will be describing is to measure two sections off of a straight edge to determine its proper location.
If hard edges aren’t something you can measure off of then the next best thing is to use a level, or a second person in the distance to eyeball the location until you find a visually pleasing position. Then secure with tape described in the next step.
The easiest way to do this is to get an approximate idea of where you want it to be. Then find out the distance it is from a hard straight edge (floor, ceiling, shelf, window trim, etc.). Make a measurement from the approximate left side of the print. Mark with a piece of tape (or pencil) and make sure it’s a small piece of tape and as level as can be. Then repeat this for the right side. So now you have two markings to align the print up to when securing into position.
Repeat for the other direction (left/right or top/bottom) if necessary. The image below has a visual representation of making measurements for just the top side.
If you are centering it to a room wall, for example, there are some formulas you can use to figure out the center (whether it be centered vertically, horizontally, or both). Just measure the entire length of a wall and divide by 2. Place a piece of tape or lightly mark with a pencil.
Then measure your print length and divide by two and put a piece of tape in the middle of your print.
Align the wall marking of the center with the tape on your print that marks the center. Repeat for the other direction if you are centering it in all directions.
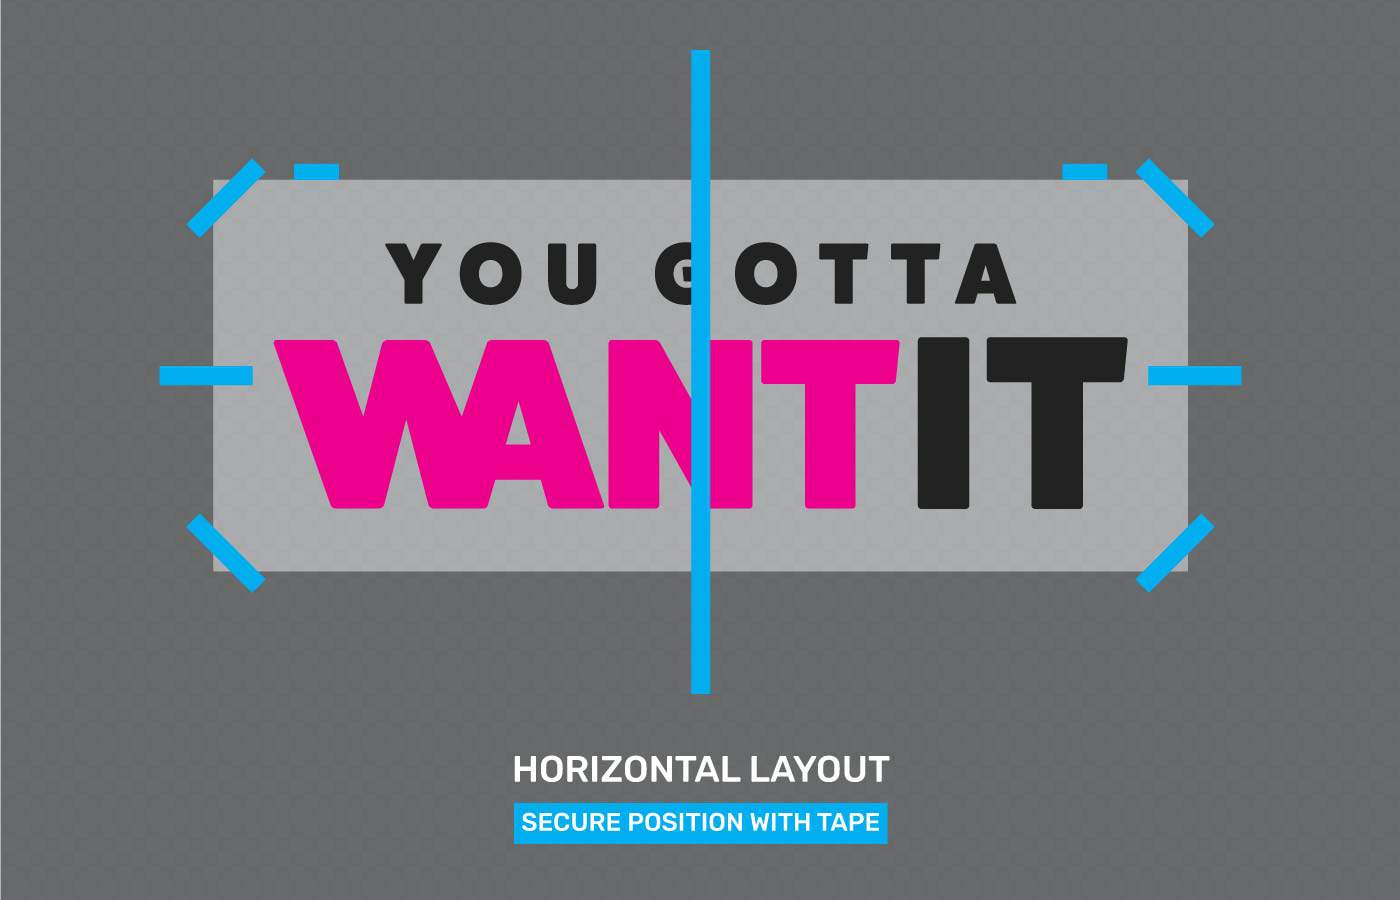
Secure in Position
Once you are satisfied with its position align it with the markings you have and secure it to the surface with painter’s tape, or any other tape that will hold it on your surface and is easily removable without damaging the surface.
We will now make a temporary hinge in the middle with tape either vertically or horizontally (as described in step 1). As well as tape to hold the corners and other long spans to keep the print flush to the surface.
The goal is to install this in two sections based on the install direction chosen. Install one section, then release the other section to complete the installation.
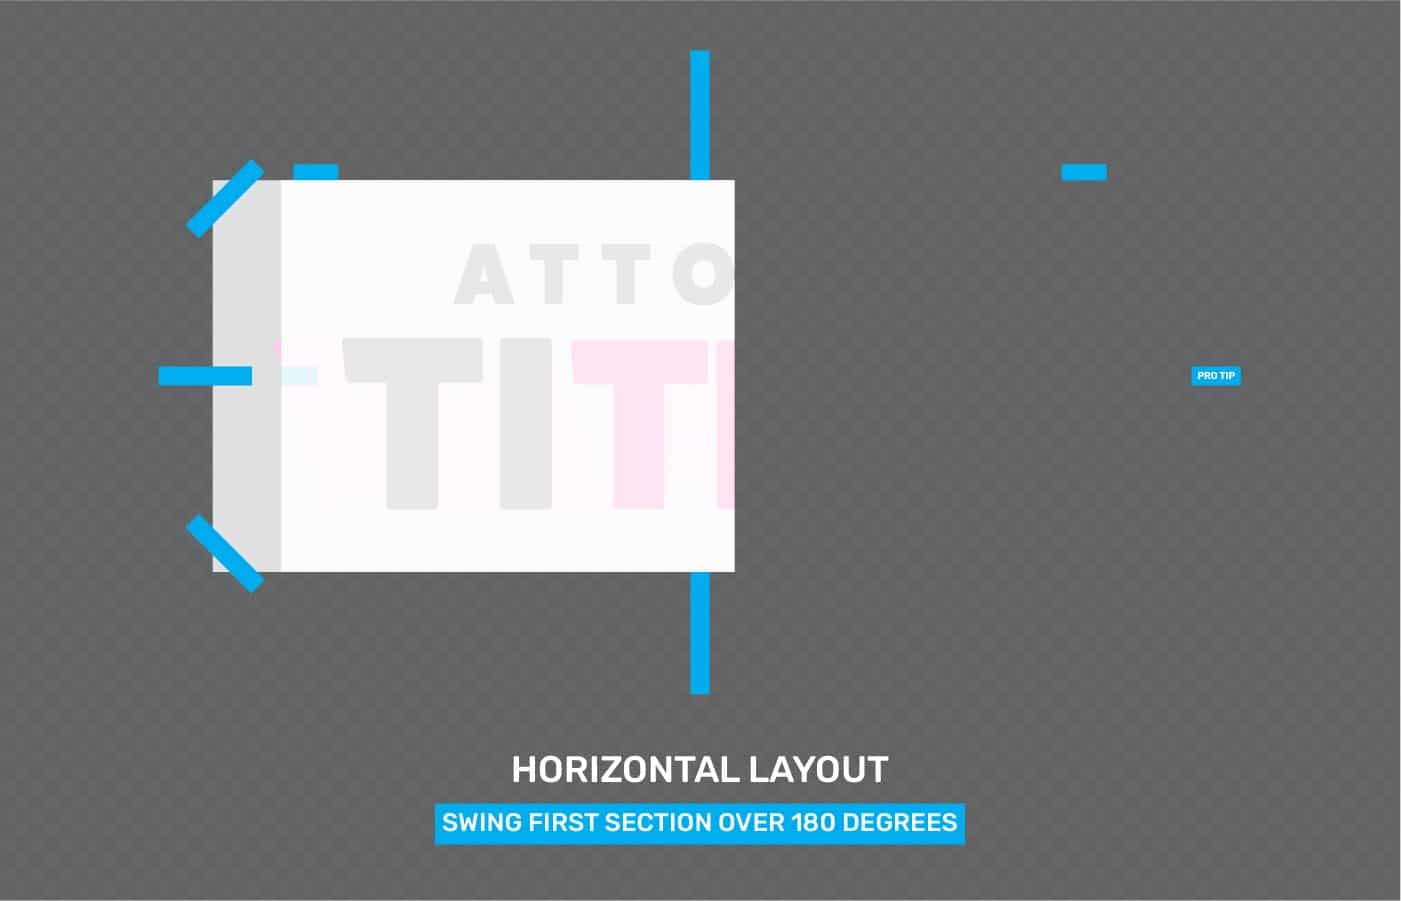
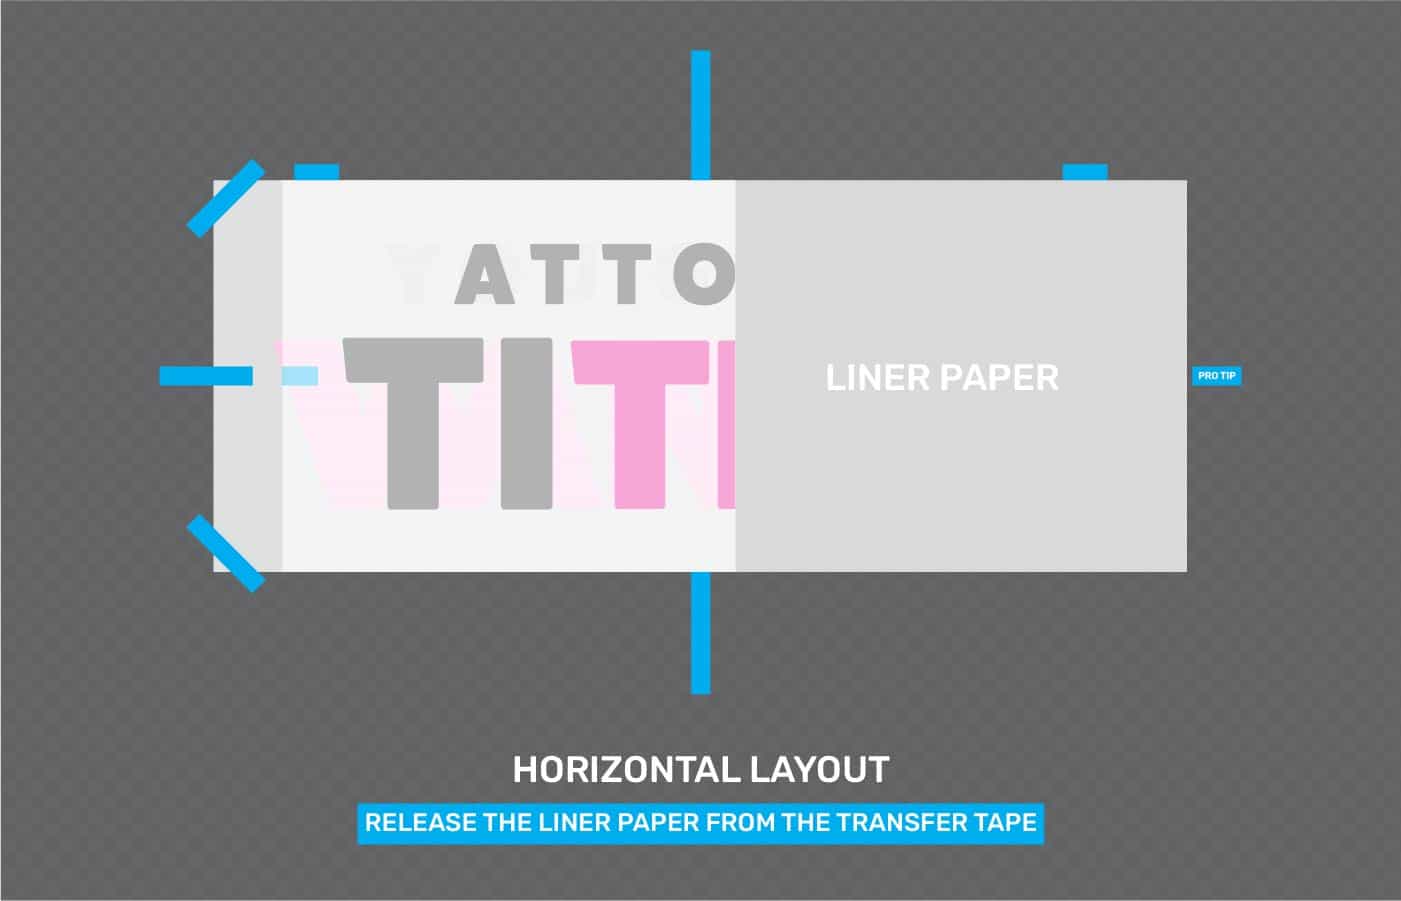
Release the First Section
Next, you will need to remove the positioning tape holding it to the surface from one section. In the photo below we will be releasing the right side of the hinge on the example on the left and the top from the example on the right. This will demonstrate the process for either a horizontal or a vertical based layout.

Swing the released side all the way 180 degrees so that it is flush to the surface. Then begin to remove the liner paper 180 degrees the opposite direction. Leaving the transfer tape in position and only pulling the liner paper away. This may be easier with a second person. If you only have one person you may need to tape the transfer tape to the surface, while you pull the liner. The vinyl material should stick to the transfer tape. If any of the vinyl material is not sticking to the transfer tape, apply pressure from the back of the liner and slowly roll the liner away until the vinyl material is on the transfer tape.
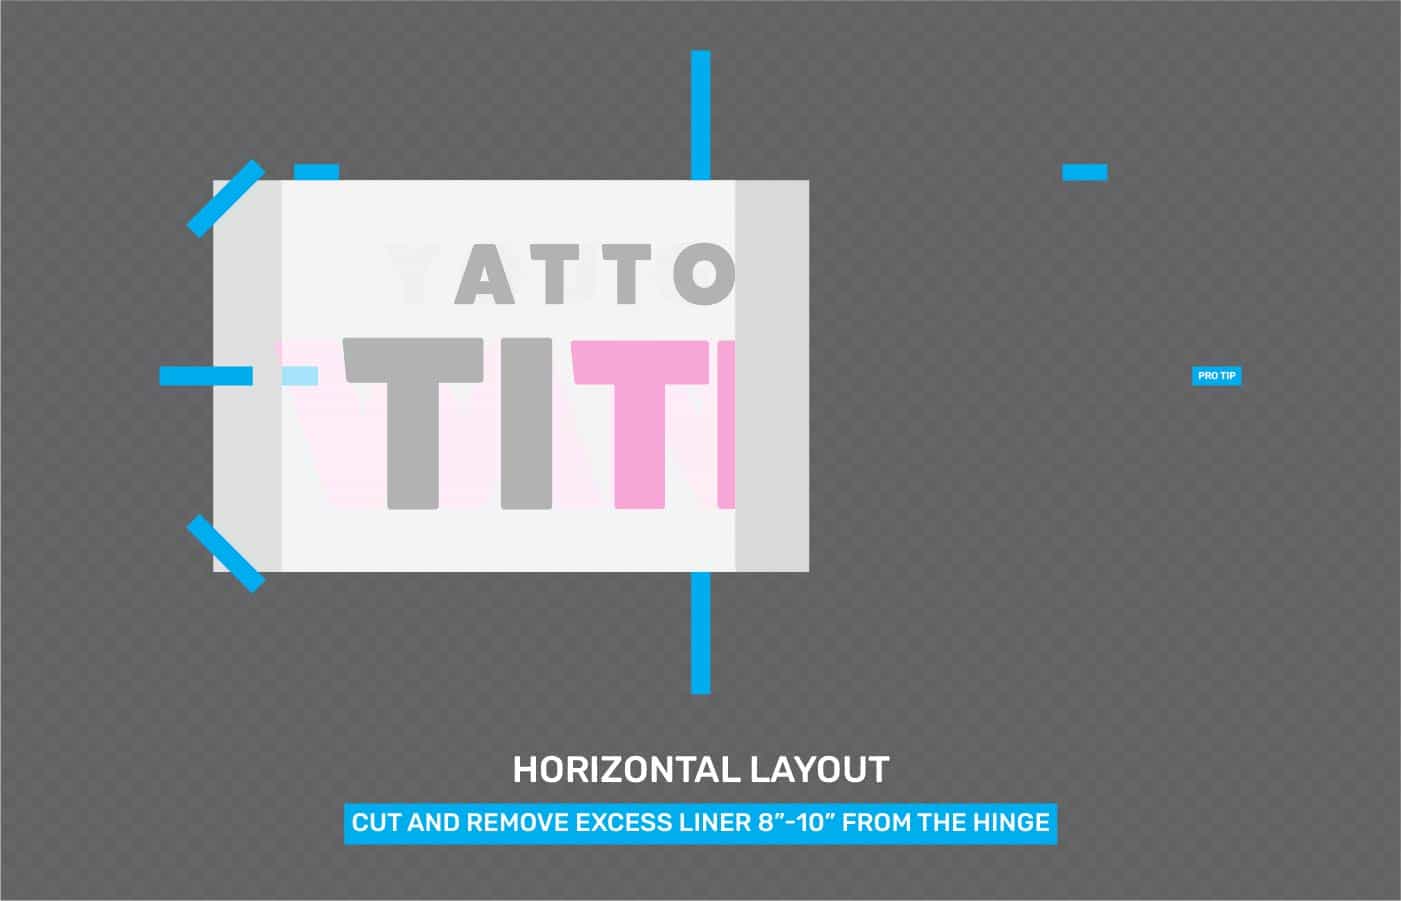
Once you have pulled the liner all the way back to the hinge you will need to make a straight cut with scissors or a utility knife, approximately 8″-10″ from the hinge to remove the excess liner paper.
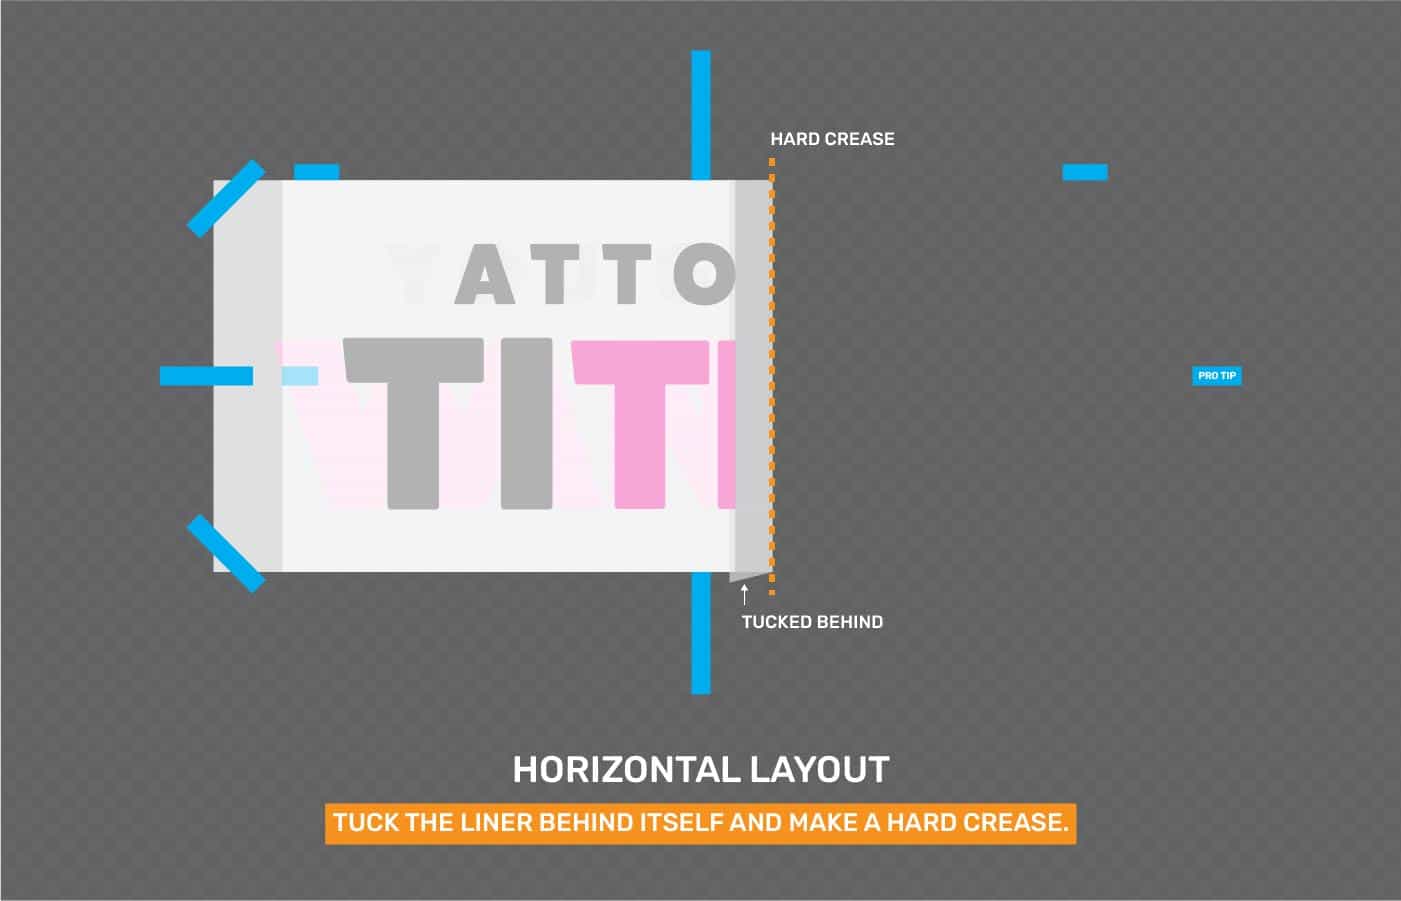
Tuck the liner behind itself 180 degrees and make a hard crease. So that when you perform the next step the transfer tape will be flush to the surface.
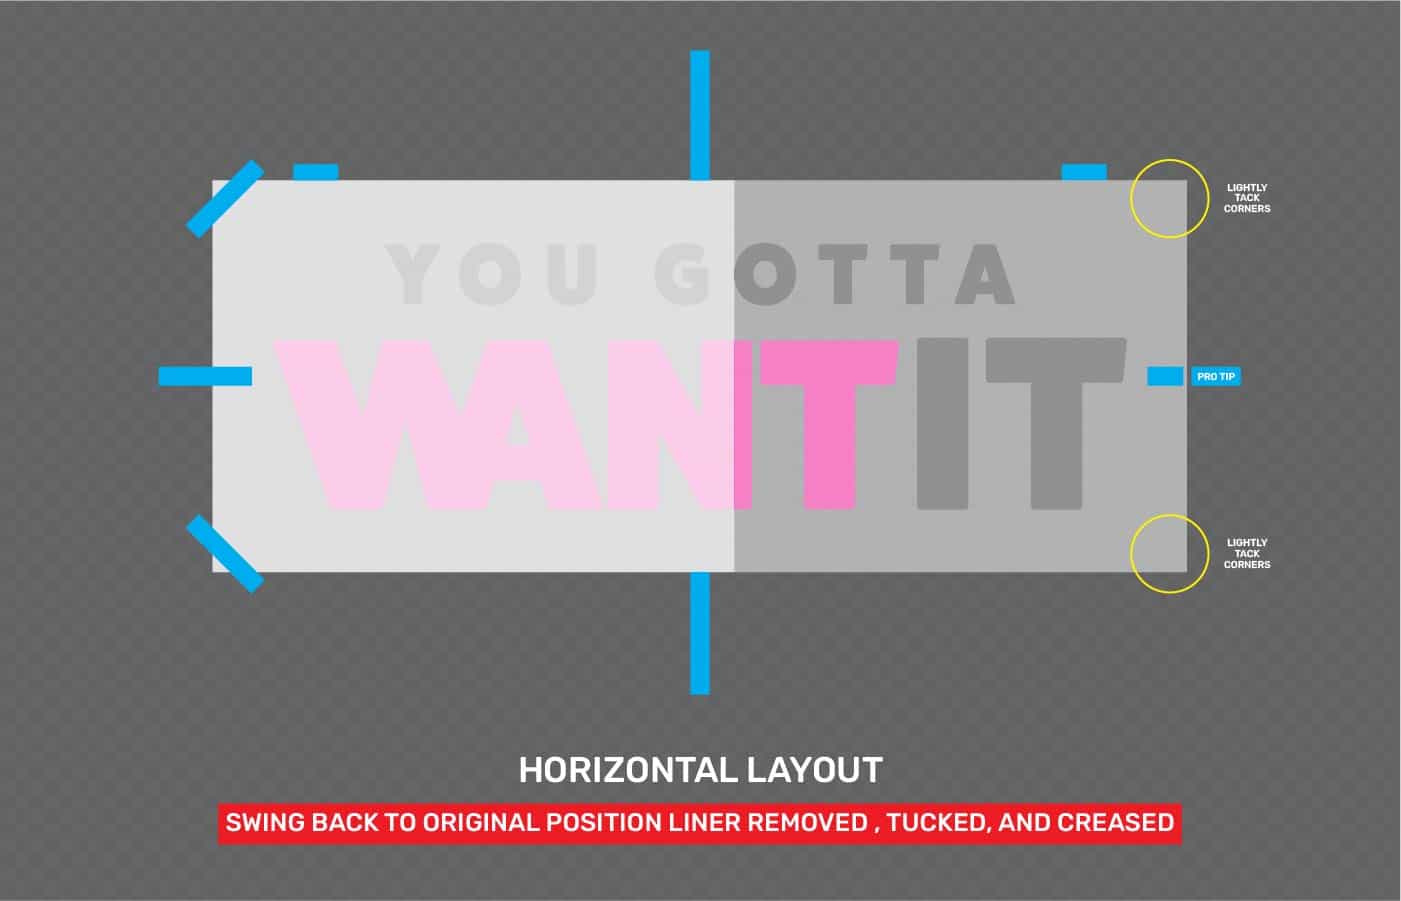
Apply the First Section
Now we will need to swing the transfer tape (with vinyl material stuck to it) all the way back to where its original spot was. Make sure the adhesive side does not touch itself when performing this task. It will be really difficult to recover if the stickers and tape stick to itself. Lightly tack the corners of the transfer tape to the surface so that it is stuck and will not fall.
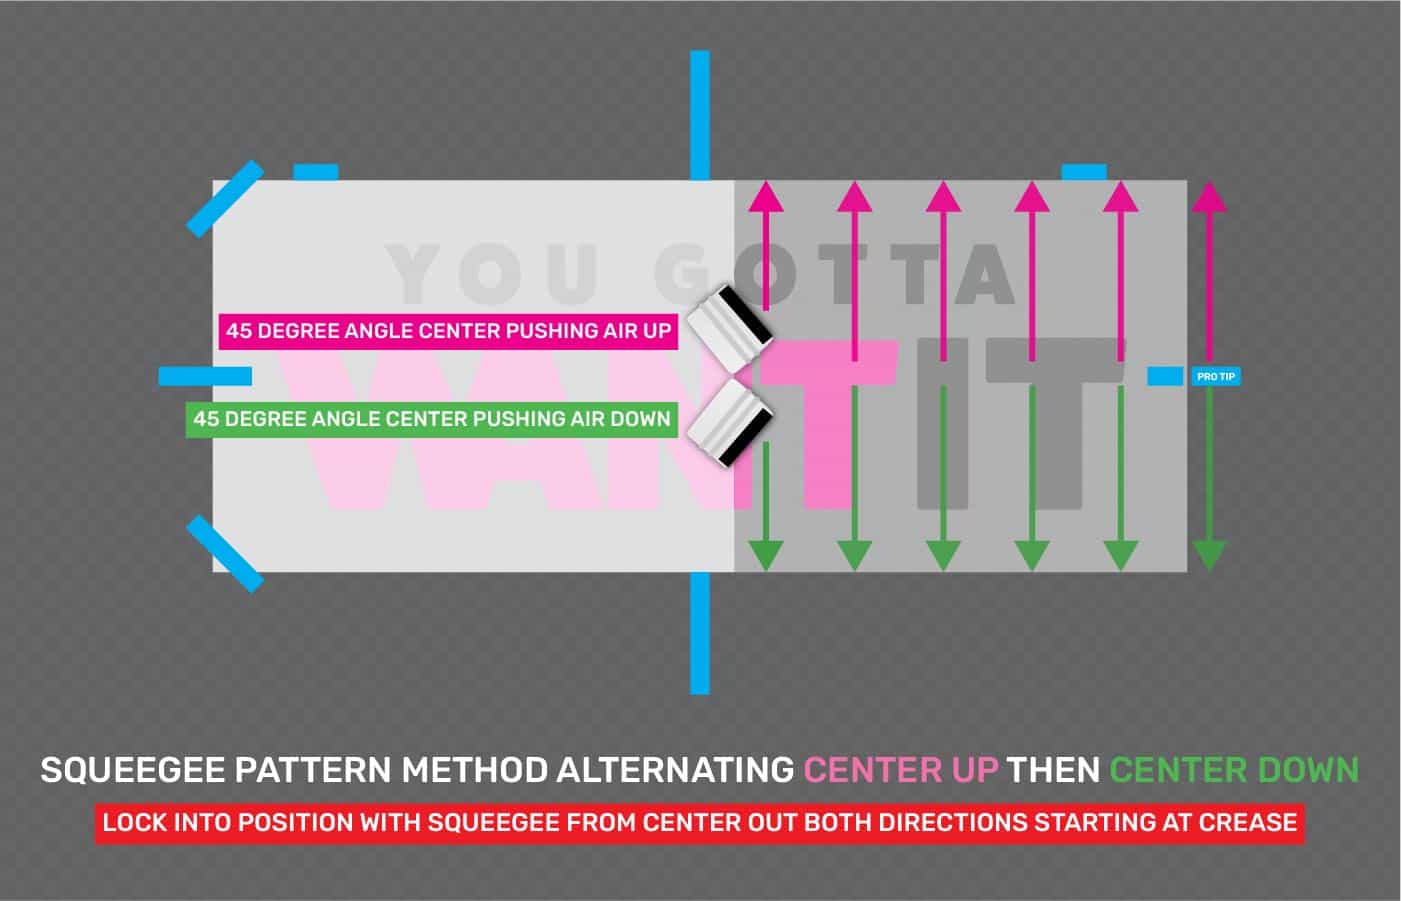
Lock the hinge in place and install first section
With a squeegee, begin applying pressure pushing from the center out for both the left and right sides. Angle the squeegee with a 45 degree angle for each swipe to lock a solid hinge in place. Then repeat the swiping pattern as shown in the image below until you reach the end of the transfer tape.
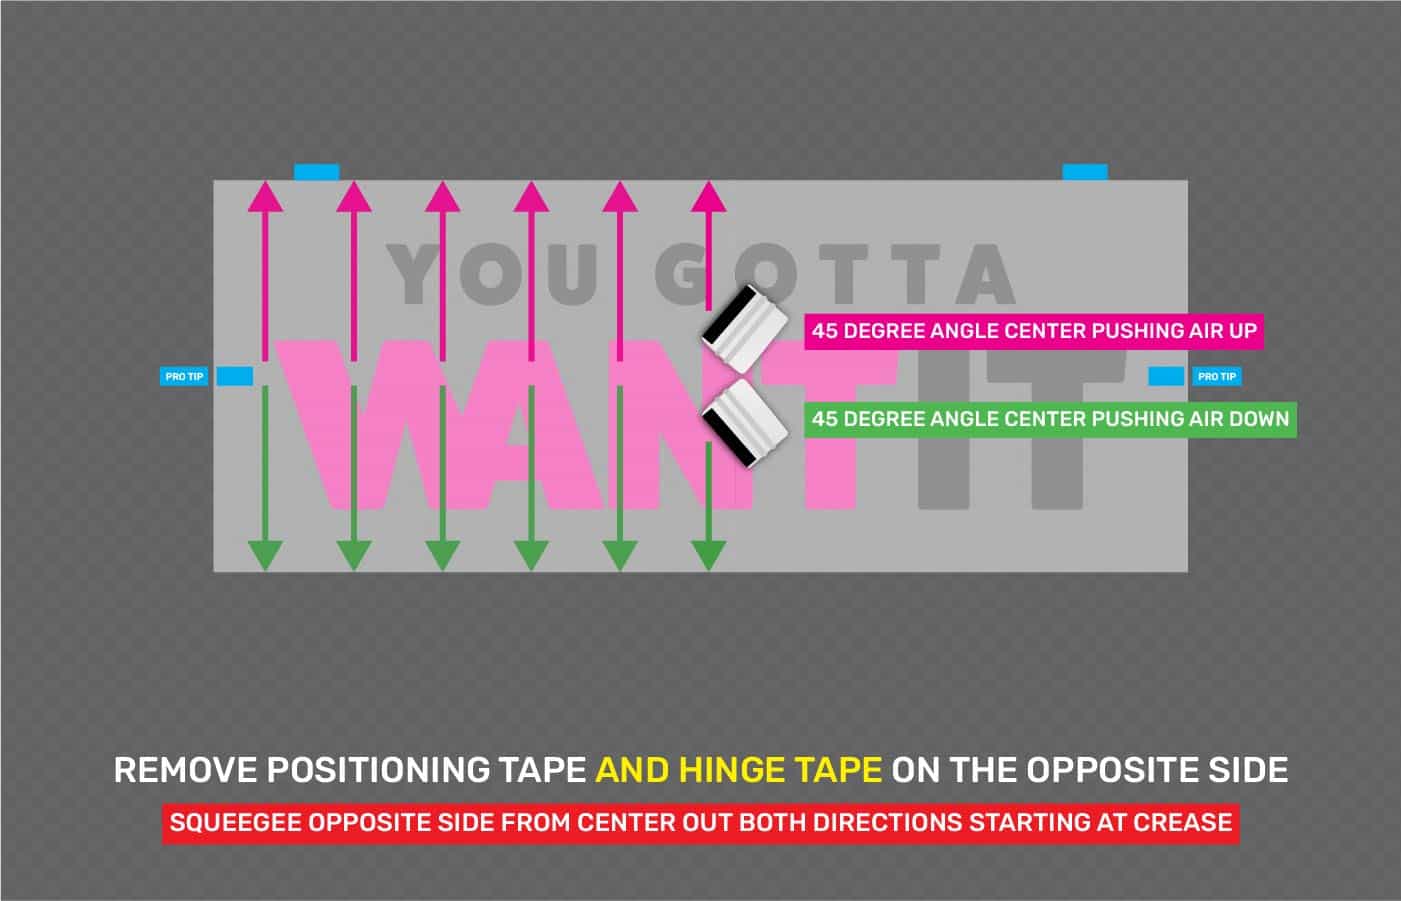
Remove Positioning Tape and Install the Second Section
After you have removed the positioning tape for the second section you can then begin to remove the liner from this section. Grabbing the creased and tucked liner from the previous step, pull away about 1-2 feet of the liner and continue with the squeegee in this direction. Apply in 1-2 feet sections until you reach the end.
Another method would be to remove all the backing liner before performing any squeegee tasks. Bring the transfer tape to the original position and lightly tack it to the surface. Then proceed with squeegee.
If the vinyl material is not sticking to the transfer tape you may need to swing this half and pull the liner paper away by applying pressure to the parts of the vinyl material that are not sticking to the tape. Then swing it back to resume installation.
Remove Transfer Tape
Almost there! Now that everything is fully secured to the surface with the liner removed. Apply pressure to the entire piece promoting the adhesion of the vinyl material to the surface.
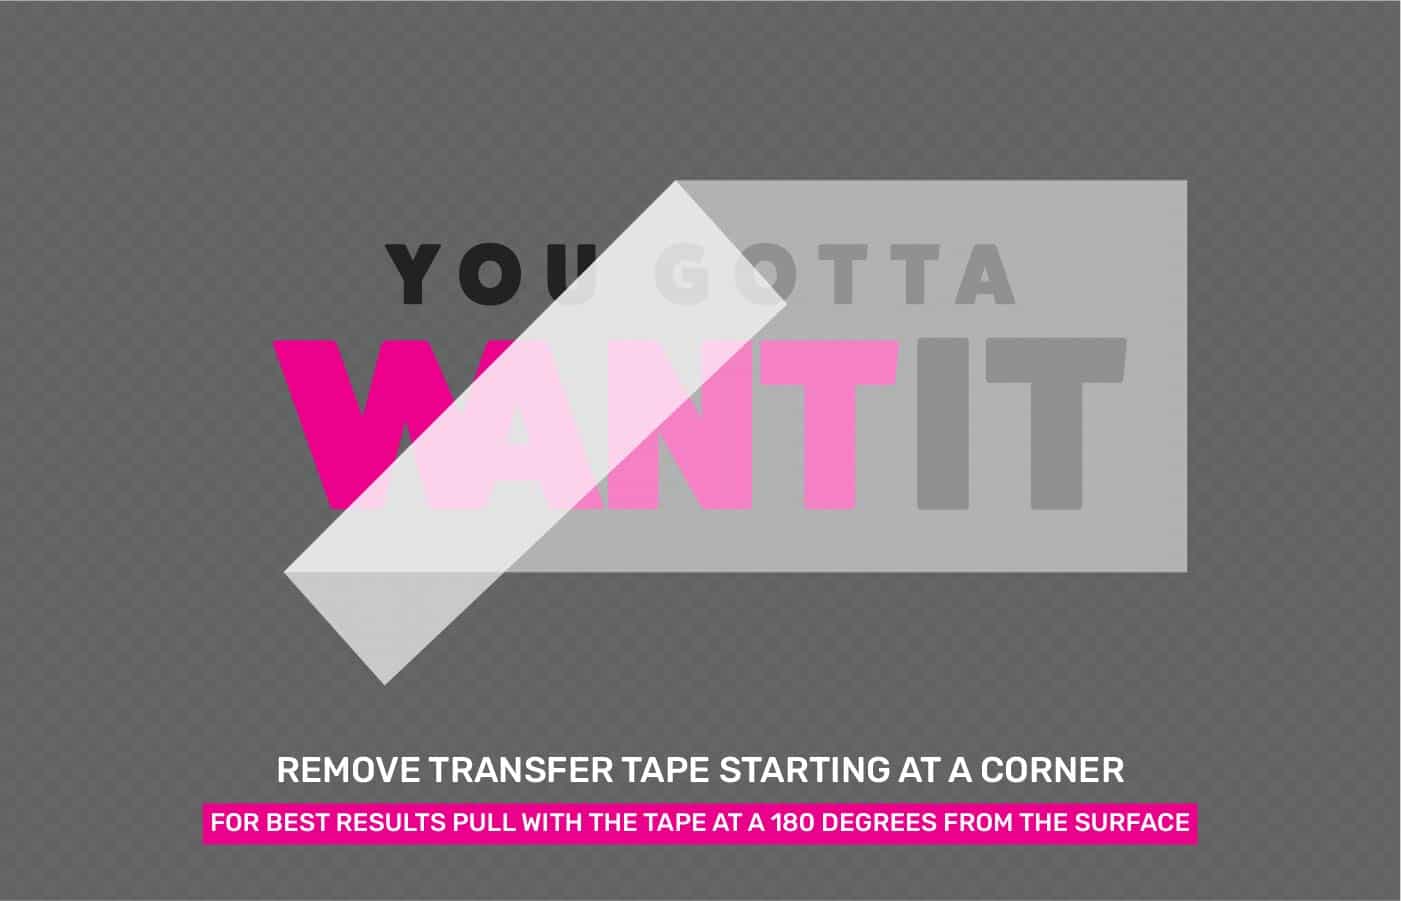
Next starting from one corner, begin slowly removing the transfer tape at a 180 degree angle making sure just the tape is coming off, and the vinyl material is remaining on the surface.
If any parts of the vinyl material are not sticking to the surface, apply pressure from the front of the transfer tape while slowly removing the transfer tape.
Complete the Installation
Now that the tape has been removed just go around and double check that there is no loose vinyl, bubbles, or air gaps in the vinyl materials. If you notice anything that needs more adhesion, simply use your squeegee to apply pressure. You may need to check this for the next couple days as the bond of the adhesion increases.

FAQ
Most frequent questions and answers
Transfer tape is a masking tape that is applied to the top of the printed and cut vinyl. This allows you to install individually cut vinyl pieces as a whole. Then once the transfer (masking) tape has been removed only the vinyl material remains on the surface.
This is common due to transfer tape taking an aggressive hold on the vinyl material when rolled up for shipping.
99% of the time if you lay the print flat prior to installation for a few hours it will relax the print, tape, and liner. It will still have visible wrinkles or tunneling, but you can be assured that when you install you will find that once the liner has been removed, the transfer tape and vinyl will be at ease and ready to install without the wrinkles or buckling.
The main reason for the vinyl not sticking to the transfer tape is the direction that it is being removed. Think of it as removing the liner paper as opposed to pulling the transfer tape. You can’t simply pull the tape away and always have the vinyl stick to it. You have to work from the back (liner) side and pull or roll the liner away at a 180 degree angle.
It’s recommended to first pre-squeegee to apply pressure and promote the adhesion of the transfer tape to the vinyl material itself right before installation. Then remove the liner paper from the transfer tape.
When it comes time to remove your installation, simply pick at a corner of a part of the graphic element or lettering and then remove at a 180 degree angle. Don’t pull perpendicular away as that may promote the pulling of paint or damaging the surface.
It will also depend on a couple variables, such as climate and duration of the installation. The longer it has been applied (and high temps) the stronger the bond of adhesion will be.
Whether it is a removable or permanent adhesive that was ordered, they all may have special techniques that have to be implemented to remove cleanly. Common techniques to reduce the adhesion and allow for a clean removal are using a heat gun, removal solution, or steam. On most surfaces a removable adhesive is easy to remove without these tools, but not guaranteed.
Windows are somewhat difficult to install because of its high surface energy. A window glass will provide strong initial adhesion. So, once you have removed the liner be careful not to let the application tape or vinyl adhesive side get stuck to the window. It may be extremely difficult to remove it and try to reapply.
We would suggest having a second person around to help hold areas when removing the liner paper, especially for medium to large-sized prints.
It depends on the floor type. Please refer to our article about preparation and cleaning floors for vinyl installation.
It’s important to address any rust or paint flaws on the vehicle’s body. Vinyl cannot bond properly to textured rust, and attempting to remove vinyl near rusty areas can cause more paint to peel off the vehicle. It’s recommended to find a way to smooth and seal these professionally.
If you cannot eliminate the rust and need to apply the vinyl over it, consider cleaning thoroughly and using adhesive promoters to help the vinyl stick to difficult surfaces. However, be aware that using a promoter does not guarantee a clean removal.
Additionally, water and moisture can compromise the adhesive over time, potentially causing the vinyl to lift or fail. Other concerns include the potential for the vinyl to highlight existing imperfections, making them more noticeable, and the possibility of the wrap not adhering evenly, leading to bubbling or peeling.
For small installations, you can if you are in dry climate, on a calm day with no high winds. Windy conditions could contaminate the adhesive side when applying, or blow dust on to your prepared surface prior to installation.
For best results it is to install indoors (especially for vehicle wraps) in climate controlled room. With the vehicle adapted to the room temperatures for 24 hours prior to installation.
Pro Tips!
While installing use these tips to avoid complications with your installation
- Have a second person available if possible
- Avoid the adhesive side touching and sticking to itself. If it does gently pull the material apart from each other.
- Avoid having dirty or oily hands while touching the adhesive side
- Avoid the adhesive side from touching anything with clothing, fabric, or dust particles.
- If you have any bubbles in your installation you can poke a small hole on the edge of a bubble, then from the opposite edge push the air of the bubble towards the small hole you’ve made to release the air.
- If you have a freshly painted wall it is recommended to allow a minimum of 2 weeks for the paint to cure before installation.