


Adding Bleed To Your Artwork
This is an essential part to file setup for print production if you have access to graphic editing software. This allows for ink to extend past the edge of the cut path of your design. Allowing for some variance during the cutting process. If you add bleed you will also want to indicate the cut path for your print.
In most cases, if you do not have a graphic editor we can add the bleed for you. Just upload the design with your graphic designs extending to the edges.
Steps to manually add bleed to your design files
We recommend at least .125″ of bleed for most products, but in some cases more or less may be appropriate based on the graphics and products ordered. This is if you want to manually add your own bleed to the artwork.
Please don’t be discouraged by this process if you do not know how to add bleed. Simply place your order and in 99% of the cases, we can use your raw graphic designs to create bleed on our end. Leaving all of the editing in our hands. Your only concern is to verify that everything looks 100% accurate on the digital proof that is sent after you order. We won’t print anything until your proof on the screen looks exactly how you want it to look!
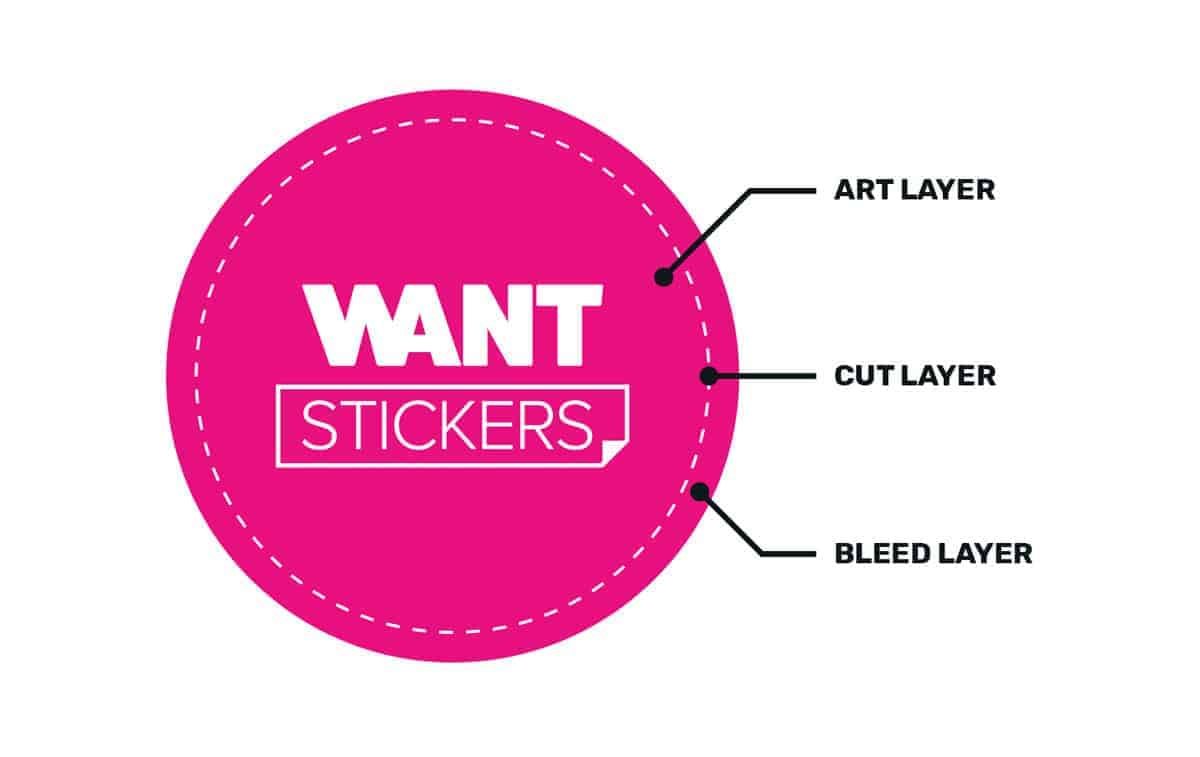
Create Your Art Layer
With your artwork opened in the software of your choice, create a layer that has the final desired artwork on it.
For vector graphics, It is recommended to expand and convert text to outlines. Then group all of the art together so that it is all contained within the layer.
If you want to keep an editable version of your file, be sure to back up the original. This way, you can go back and make any changes if you need to. Once you expand your design your strokes, text, and shapes will be commited.
Add Cut Layer
Optional but very important is to create a cut layer to indicate where the actual cut is. This shows our designers exactly where the cut is and what is considered bleed. Add this layer above all other layers and use the unite feature in the pathfinder of Illustrator to combine all shapes for a single cut layer.
Add a Bleed Layer Below
Next, create a layer below to add the desired bleed that extends past the edge of the cut path or artwork boundaries. In most cases, it may be easier to just duplicate your “Design Layer” then simply add an offset path effect to that layer. This will allow you to add additional color or graphics that extend past the actual design layer creating a natural bleed.
In some cases with complex artwork, the amount of the offset effect may need to be tweaked in certain areas so that they do not overlap each other, or do not interfere with very acute angles of the design.
A safe offset path value with smaller graphics is .125″-.25″ but may vary on smaller or larger prints.
Want Tips?
- If your artwork already includes bleed and extends past the cut path, there is no need to add a separate bleed layer.